Over this past weekend I had several jobs I wanted to get done. We have had nine tomato plants sitting in the window of the living room waiting to be transplanted, bean & pea planters overgrowing with weeds, and a fenced-in garden plot that hadn’t been used in many years. Everything I wanted to clean up would require a great bit of work over the course of Saturday and Sunday.
 My focus for this post is on what I did on Saturday. Sunday only involved light work on the back deck while Saturday required 8 hours of focused work from the morning running into the early evening.
Looking at the garden I had to work with I wanted to ensure there would be adequate space to accommodate the Keyhole Garden, the existing native plants (namely wild mint and tay berries), and a 16×16 ft area for Aaron’s pumpkin patch project. This photo shows the south-east corner of the garden area with the seedling greenhouse visible behind the trees in back.

Can you name each tool shown in the photo?

The area cleared in this image is 8×8 ft and is adjacent to the soon-to-be pumpkin patch!
I gathered my tools and materials largely ahead of time. I say “largely” because I only started collecting the mulch, soil, and compost on Saturday. The tools and stones had been assembled in the couple of days leading up to the weekend. I used the simplest tools and methods I could to show that any community, regardless of the materials available, can create this type of garden. Specifically, I used a straight hoe, shovel, hand sickle, hatchet, broadfork, measuring tape, and wheelbarrow.

A 6 foot circle… cleared!
I then cleared an 8×8 ft square area where the chicken coop used to be. The benefit to this was that most of the ground was clear of some larger weeds while on the downside it meant I had to move the chicken coop out of the way before starting work. I marked my measurements with large stones and prepared to enter the next phase of construction.
After clearing the larger 8ft square I did a much more thorough job clearing away a 6.5ft circle centered on the center of the 8ft square. Lastly, I measured out the placement of the 1.5ft compost basket that will go at the center of the garden. I’d seen a few ways of making this basket including using chicken wire, gardening cloth, or weaving a basket using sticks and straw/grass. I liked this latter method as it seems like something almost anybody could manage to do.

I later used a lot of the dry grass and straw that I collected when clearing the area to mulch the area around the keyhole as well as to construct the compost basket.

It’s a bird! It’s a plane!… it’s my thumb in the frame.
Despite the intrusion of one of my glove-clad digits I think this photo should help give an idea of what the mulch and straw was used for. The bottom-most layer of the garden called for a layer of mulch and debris. I decided that the thin layer of mulch would be adequate as the soil underneath was deep and perfect for growing. I also started to wrap the dried grass around the central basket frame. This was actually quite straightforward. I also began to build up the garden wall using the many, MANY, rocks that I had collected (by hand).

More wall, more soil, more basket, more everything!
I worked through to the afternoon adding rocks to the wall of the garden, hauled soil to fill the bed, and built up the compost basket (including added layers of manure and organic compost). I left a large amount of room at the top of the basket for household compost from the nearby cottage.
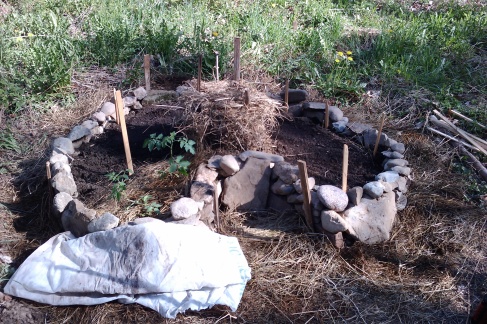
The end result!
The end result turned out pretty much as I had expected! I would have liked for the walls of the garden to have been about 3 feet tall rather than 1 foot (as it turned out). However, did I mention that I hauled the 160lbs of soil, 150lbs of rocks, manure, compost, and mulch all by myself? I imagine that an entire village of people could build a much larger Keyhole Garden. However, considering I was myself and used the simplest methods possible I think it turned out pretty well! I planted some cherry tomatoes (as seen in the photo) that I had to cover overnight because of a random frost warning. I also planted some dill in a couple of places, some sweet basil, summer savoury, thyme, and Swiss chard. I will definitely give periodic updates on the success of this project!

BONUS PIC! A pic of the work as seen from under the pear tree arch I tied up earlier. This is truly going to be a magical place once everything is is full swing!


